Flight preparations for the simulator flight
|
As the word simulation already says, the control of an airliner or other aircraft should be simulated on the PC. This should be as close to reality as possible. In reality it looks like the flight crew only needs about 90 minutes for the preparations. To discuss the details here would be too much for us PC pilots. But we too should seriously consider all the preparations we have to make to make a flight as realistically as possible. The following documents should always be at hand:
Flight plan preparation: What is the weather like at the start - destination airport and en route?
The easiest way to generate weather on a flight simulator is to use the possibility,
to download the current weather from the Internet via "Real Weather".
There are several possibilities to get a weather forecast of the destination airport in advance.
The easiest way is to use programs like "SerfInfo", which can be downloaded after entering the ICAO code
of the destination airport displays the current weather. This is then done as a METAR string,
which must first be decrypted again. Also for this there are helpful programs like METAR-Translator.
After input of the string, it is "understandably" reproduced.
Again, there are several possibilities for route calculation. The easy way via the route planner of the FS.
Here you enter the start and destination airport and the FS calculates the flight route via airways in the lower or
upper airspace. The disadvantage here is that the FS does not know SID and STAR.
Another possibility leads us again to add-on programs like the time tables of Ultimate-Airlines,
or other route planners such as "RouteFinder". Also here the SID and STAR must be
be incorporated into the flight plan. After the route planning we now also know the distance and can
get us started on calculating the fuel requirements.
How much fuel do I need for this route?
Here again the reference to useful programs that facilitate the calculation. For example Keroplan.
But it also works without the help of programs. There is a relatively simple rule of thumb:
Maximum take-off weight x 5% per flight hour
Everything is in here (taxiing, take-off, climb, cruise, descent and landing). Example: Boeing 737-400 with Max TO-Weight 68 tons,
Flight duration 2 hours. 68 t x 5% = 3.4 X 2 hours = 6.4 tons. A reserve of 5 tons is added to this.
For our example we would refuel as 11.4 tons of kerosene. It would be necessary to add to the fuel calculation,
that the consumption of the individual aircraft as well as the consumption of the identical type, e.g. 737-400, can vary considerably.
This is due to the differently programmed Air-Files. It is therefore very advisable to always fly with the same aircraft type.
On the one hand the control of the aircraft becomes better and better with increasing number of hours and on the other hand the
Fuel calculation simplified, since one has direct comparison values for the individual routes, and on empirical values
can fall back on.
What is the best altitude to fly at?
The rule here is: go up as fast as possible and stay there as long as possible. Every jet flies most economically at high altitudes.
Even a flight time of only 10 minutes to FL 300 or FL 330 can save more kerosene (despite climbing there),
than a routing over 30 minutes to only FL 220. There are still some criteria to be considered for the intended flight altitude.
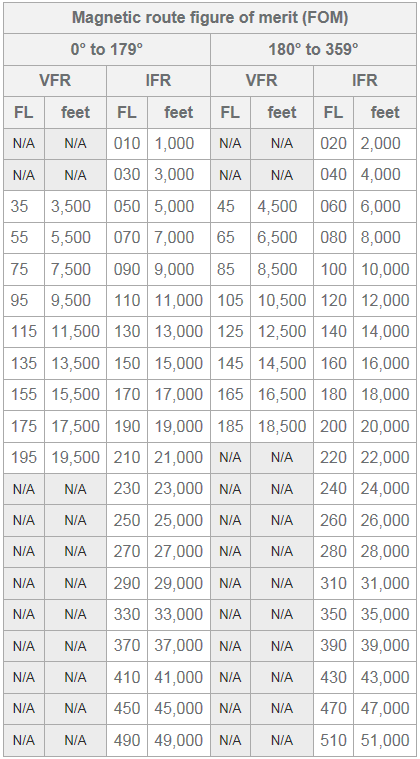
For example, there are the "semi-circle flight altitudes", which must be strictly adhered to. Since 24.01.2002, the airspace above
of FL 290 newly staggered.
 The table was taken over from Wikipedia. More details can be read here.
Furthermore, the high winds should also be taken into account. Especially for FS pilots a really interesting matter,
as these can now be loaded with the real weather. It can therefore be useful,
prefer not to choose the optimum altitude, but to fly a little lower to take advantage of a possible tailwind.
How the wind can affect the different speeds (GS / IAS / TAS), can be read here.
Since the flight simulator also has a very good flight planner, which also allows to plan the airways in the lower and upper airspace
but unfortunately it does not yet contain a SID or STAR database, it is a reasonable way to plan a flight
it is essential to obtain the tickets for the respective airports. Here again the Internet is a good supplier.
For the German airports you can find all imaginable documents and maps at ivao.aero.
The charts included in the German Airports series are also very detailed and quite sufficient.
(standard instrument departure routes):
these are fixed departure routes that are used to leave the airspace around the airport quickly and safely.
They have been chosen to provide noise protection for the airport's neighbours and also to avoid possible obstacles such as mountains etc.
etc. too close.
These SID's are taken from the respective airport charts. The selection depends on the departure direction of the Rwy and the
followed by routing. SID's always have an individual name. For example ALB4N (Allersberg Four November)
for a departure on Runway 26 R in Munich. This SID ends at VOR ALB (Allersberg) and will then be flown,
if the flight path is northbound. The BEFORE ALB should then also be the first waypoint in the further flight path.
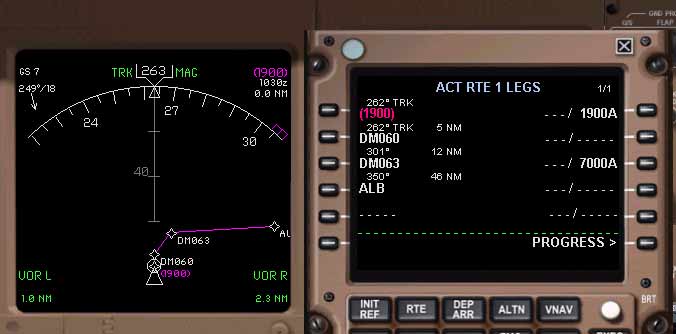
And this is what the SID looks like in the PFD (Primary Flight Display) and FMC:
The flight path leads through points DM060, DM063 to the VOR ALB. This is also shown in the FMC, as are the altitude specifications that must be observed. First follow the direction of the Rwy up to an altitude of 1900 feet AGL (above ground), or a distance of 3.5 NM from VOR (DMN). In the maps it is usually written "whichever is later". The altitude indication in the FMC 7000A, means that waypoint DM063 should be flown over at an altitude of 7000 feet, the A means "or above", or higher. In the charts, the general climb instruction for Munich is 7000 feet. This can of course be changed at any time by the ATC (controller) as required.
For online flights, you inform the ATC when this altitude is reached and then receive further instructions.
this leads over the airways (enroute) which, as already mentioned, must be strictly adhered to. These airways also have a designation such as 4 B, or 12 Y, whereby the letter is referred to as the English colour. Here, therefore, "four blue", or "twelve yellow". These airways can be very long and many VOR's and Intersection's are flown over.
Since in some areas of the earth, e.g. over oceans or deserts, there are no VHF transmitters or the ranges are not sufficient, almost all route points are provided with earth coordinates in addition to the frequency information of the VOR'S. This means that all points and intersections, but also mandatory reporting points or intersections of airways over the oceans with latitudes or longitudes of 10 can be stored in the FMC and recognised during overflight.
Some airways are parallel to each other to accommodate several aircraft at the same flight level (FL). When selecting the airways, a direct connection to the destination should be chosen if possible, unless weather restrictions, e.g. strong upwind winds (jetstream), or a bad weather front require a detour.
(standard instrument arrival routes):
On approach to the destination airport, you leave the airways at Intersections and fly over the STAR, which must be precisely adhered to,
to IAF (Initial Approach FIX). From here, the ILS approach point is then approached.
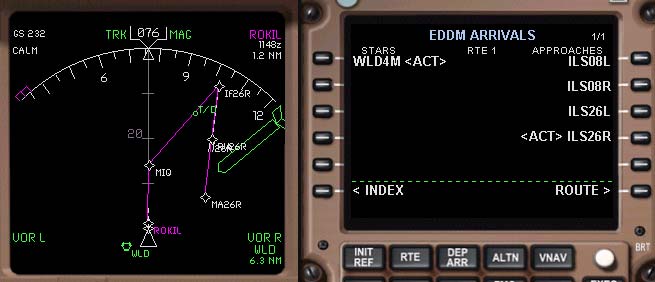
here the STAR WLD4M (Walda Four Mike) in PFD and FMC for the approach to Rwy 26 R in EDDM  here is the routing to it: 
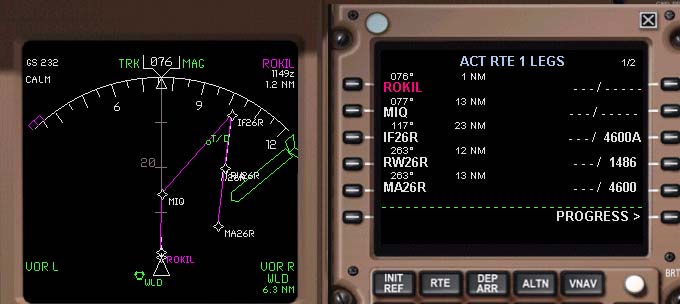
At the Intersection ROKIL the airway is left. Continue to the NDB MIQ (MIKE), from there to the IAF or here IF26R.
This is the point which leads us directly to the ILS of the 26R.
The altitude information in the FMC at IF26R means again: here a minimum altitude of 4600 feet or a little bit higher should be kept.
The 1486 feet is the height of the square. MA26R is the point that must be approached in a MA (missed approach).
From here the STAR is flown again. Unless ATC gives vectors for a new approach.
As you can see, a little more realism does require some work. This starts with catching up with the weather,
resulting in the departure direction and possibly cruising altitude. Depending on the take-off direction, the SID. Then you should think
on the "fuel consumption". Check the weather at your destination. Have charts at hand for when you are on the road in case an unscheduled
landing should become necessary. About possible alternative airports one has of course already informed oneself before :-).
With online flights it is also always possible that the sophisticated flight planning is destroyed by the controllers.
You want to fly your STAR, but the controller thinks you should fly in the direction of VOR XYZ
and from there on course 123 in direction ILS. Woe to him who has no maps and has to ask umpteen times,
where the BEFORE XYZ is, how he gets there and what frequency this BEF has. But if you have the map material...
If you have put it right, one look is enough and the matter is eaten :-). The controller is happy that he doesn't have to explain everything in detail,
and the pilot proves that he is already thinking and prepared for many things before his flight.
For requests, suggestions or errors: |
